How to Recover Deleted iMessages With iMessage Recovery Software
Works for recovering deleted iMessages from iPhone 15 Pro Max, iPhone 15 Pro, iPhone 15 Plus, iPhone 15, iPhone 14 Pro Max, iPhone 14 Pro, iPhone 14 Plus, iPhone 14, iPhone SE (3rd generation), iPhone 13 Pro Max, iPhone 13 Pro, iPhone 13, iPhone 13 mini, iPhone 12 Pro Max, iPhone 12 Pro, iPhone 12, iPhone 12 mini, iPhone SE (2nd generation), iPhone 11 Pro Max, iPhone 11 Pro, iPhone 11, iPhone XS Max, iPhone XS, iPhone XR, iPhone X, iPhone 8 Plus, iPhone 8, iPhone 7 Plus, iPhone 7, iPhone SE, iPhone 6s Plus, iPhone 6s, iPhone 6 Plus, iPhone 6, iPhone 5s, iPhone 5c, iPhone 5, iPhone 4S, iPhone 4, iPhone 3GS, iPad Pro 12.9-inch (6th generation), iPad Pro 11-inch (4th generation), iPad Pro 12.9-inch (5th generation), iPad Pro 11-inch (3rd generation), iPad Pro 12.9-inch (4th generation), iPad Pro 11-inch (2nd generation), iPad Pro 12.9-inch (3rd generation), iPad Pro 11-inch, iPad Pro 12.9-inch (2nd generation), iPad Pro (10.5-inch), iPad Pro (9.7-inch), iPad Pro (12.9-inch), iPad Air (5th generation), iPad Air (4th generation), iPad Air (3rd generation), iPad Air 2, iPad Air, iPad mini (6th generation), iPad mini (5th generation), iPad mini 4, iPad mini 3, iPad mini 2, iPad mini, iPad (10th generation), iPad (9th generation), iPad (8th generation), iPad (7th generation), iPad (6th generation), iPad (5th generation), iPad (4th generation), iPad (3rd generation), iPad 2, iPad, iPod touch 7, iPod touch 6, iPod touch 5 and iPod touch 4 and so on.
Text messages (MMS), SMS and iMessages are all sent via Messages app on iPad (Wi-Fi + Cellular) and iPhone, however, iMessage has a lot of particular advantages:
- iMessages can be sent back and forth on iPhone, iPad, iPod touch, and even on Mac.
- As the iMessages are sent over Wi-Fi, they are totally free and unlimited.
- Beside texts, you can also send photos, videos, audios, contacts and locations via iMessage.
- iMessages sent or received on one Apple device will appear on all your other Apple devices.
- It’s easy to know the delivery status of the iMessages: whether they are delivered successfully, read by the recipient or the recipient is replying.
- The text bubbles of iMessages are blue, while those of text messages (SMS) green: it’s not hard to distinguish between them.
Since iMessages have so many advantages, no wonder that text messaging declined in the past years.
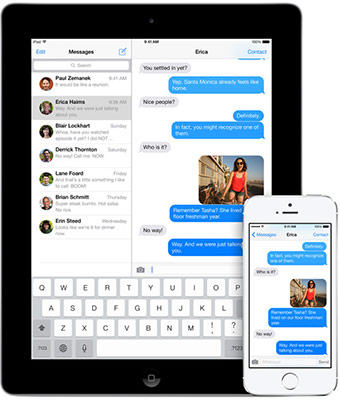
We use iMessage to keep in touch with our family, friends, classmates and colleagues. Sending and receiving iMessages become an important part of our everyday life, and we even check new iMessages involuntarily almost each hour. We may feel uncomfortable if no new iMessages are found. Message app stores the iMessage chat history on Apple devices, the iMessage conversions may record your unforgettable memories, such as the good news of your little son’s birth, the sweet nothings between you and your lovers, the photos of your trip to New Zealand with your colleagues, and so forth. Some of the iMessages are very precious so that we want to keep them on the Apple device forever and never lose them. However, we always do stupid things: deleting an iMessage conversion by mistake without second thoughts, updating the iOS but forgot to back up the data with iTunes, losing iPhone, dropping iPad in the water, etc. Then, here comes the question, is there any way to recover deleted iMessages? Take it easy. The answer is absolutely yes.
In the previous post, I have introduced the ways to recover deleted text messages from iPhone. Actually, you can also use the same methods to retrieve deleted iMessages from iPhone, iPad, iPod touch and Mac. If you have lost some iMessages on a Mac, you can try to recover the lost iMessages from your iOS device using the methods introduced in the tutorial.
Though it’s not difficult to recover iMessages with iMessage recovery software using the methods given in this tutorial, we highly suggest backing up your iPhone, iPad, iPod touch and Mac in time before it’s too late. Having a good backup habit is always the best way to avoid data loss.
In this tutorial, 6 ways of retrieving deleted iMessages from iPhone, iPad and iPod touch will be introduced:
- Retrieve Deleted iMessages from Another Apple Device
- Recover Deleted iMessages by Restoring With iTunes Backup (FREE)
- Retrieve Deleted iMessages by Restoring from iCloud Backup (FREE)
- Recover iMessages by Extracting from iTunes Backup
- Retrieve iMessages by Extracting With iCloud Backup
- Recover Deleted iMessages from iPhone, iPad and iPod touch
Retrieve Deleted iMessages from Another Apple Device
The iMessages will be automatically pushed to your other Apple devices on which iMessage is set up with the same Apple ID, and deleting iMessages on one device won’t lead to the loss of the iMessages on other devices. Thus, if some iMessages have been deleted on one Apple device (Device A), you can still find the iMessages on other Apple devices. If you need the deleted iMessages appear on the Device A again, just use the phone transfer MobileTrans to transfer the iMessages from another device to Device A.
MobileTrans is an all-in-one phone data management tool, which enables you to transfer data from one phone to another, backup, restore or completely erase a phone or tablet.
The supported devices may run iOS, Android, Blackberry or even Symbian. We’ll use the phone data transfer to copy iMessages from one iOS device to another in this method.
To download the phone to phone transfer, use the following buttons.
Here are the steps to recover deleted iMessages from another Apple device with the help of the phone to phone file transfer:
Note:
The phone transfer only allows you to transfer all the messages (iMessages included) as a whole from one iOS device to another. That’s to say, the software will erase the messages on the destination phone first (if the “Clear data before copy” option is enabled) and then move all the messages from the source device to the target one. Currently, there is no solution for transferring messages (selected one by one as you wish) from one iOS device to another, thus, if you don’t want to make the messages on the 2 devices the same, the method is not recommended. In addition, you can try to selectively back up the found deleted iMessages to your Mac or PC as an .html or a .txt file using iPhone PC Suite or print the iMessages.
- When the download is complete, install the phone transfer on your PC or Mac, and then launch it.
- Connect both the Apple devices to the PC or Mac with the USB cables came with the devices.
- On the main interface of the phone transfer, select “Phone to Phone Transfer” mode.
- Make sure that the Apple device (Device A) that has lost iMessages is the “Destination” device (on the right), and the other device that still stores the deleted iMessages as the “Source” device (on the left) with the “Flip” button at the top center if necessary.
- Tick the “Text messages” box from the options of “Select content to copy” in the center.
- Check the “Clear data before copy” option below the destination device.
- Click “Start Transfer”.
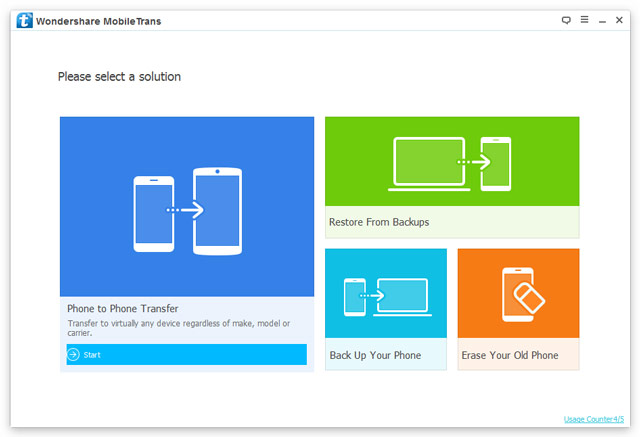
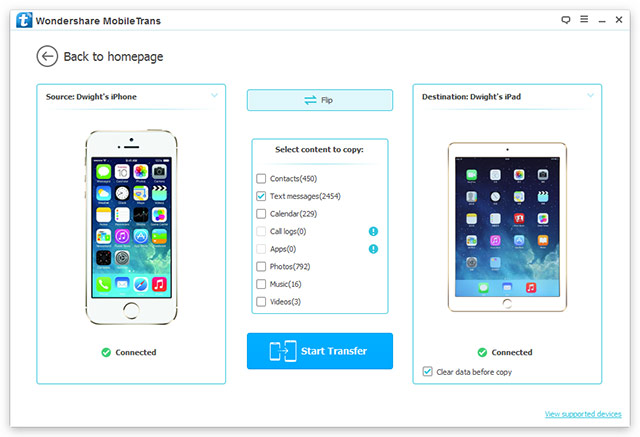
Soon, all the messages (MMS, SMS, iMessages) on the source device will appear on the destination one and all the messages on the two Apple devices will be the same. Till now, the deleted iMessages have been retrieved successfully on the Device A. Usually, not everybody uses iMessage with the same Apple ID on 2 iOS devices, they may have other solutions of retrieving deleted iMessages as shown in the rest part of the tutorial.
Recover Deleted iMessages by Restoring With iTunes Backup (FREE)
Generally, we’ll back up our iPhone, iPad or iPod touch with iTunes. Even if we didn’t back up the iOS device with iTunes manually, there is still possibility that the iTunes had created backups automatically. By default, when you connect your iOS device to the computer, iTunes will automatically sync messages (including iMessages), contacts, calendars and other information on your device. Therefore, go to “Edit” > “Preference…” and then select “Devices” on iTunes to see whether there is a backup of the device or not. If an up-to-date backup file is found, you can just follow the steps below to restore the iOS device with the iTunes backup so as to recover the deleted iMessages. If the backup was created long time ago so that you are worried about losing the data generated after the backup or you are not sure whether the deleted iMessages were included or not, this method is not suggested.
Steps to recover deleted iMessages by restoring with iTunes backup files:
- Update the iTunes on your computer to the latest version.
- Disable “Find My iPhone” by going to “Settings” > “iCloud” on your iPhone, iPad or iPod. (Only for device that runs iOS 6 or later and “Find My iPhone” is turned on).
- Connect the iOS device to the computer with the included USB cable.
- Select “File” > “Devices” > “Restore from Backup” from the menu bar of iTunes.
- Pick the backup file that you are sure contains the deleted iMessages according to the date and size.
- Click “Restore”.
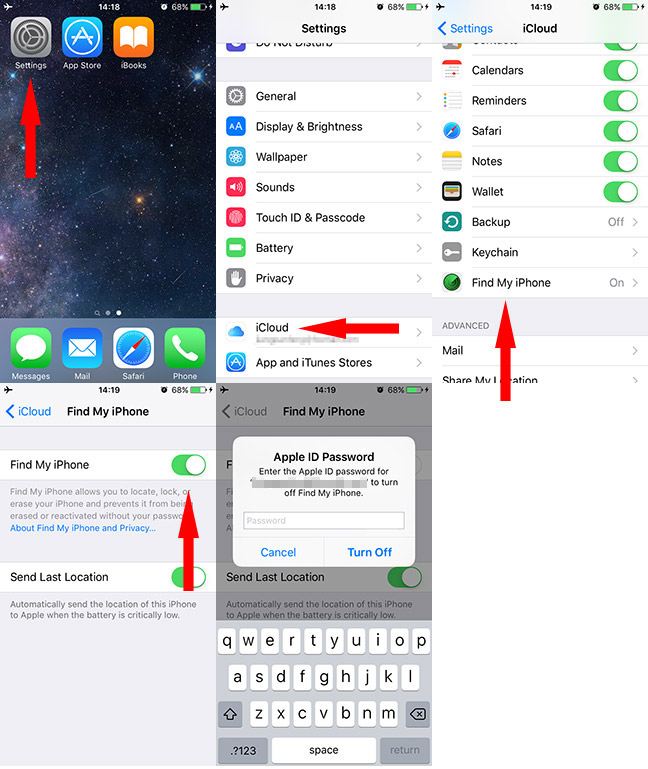
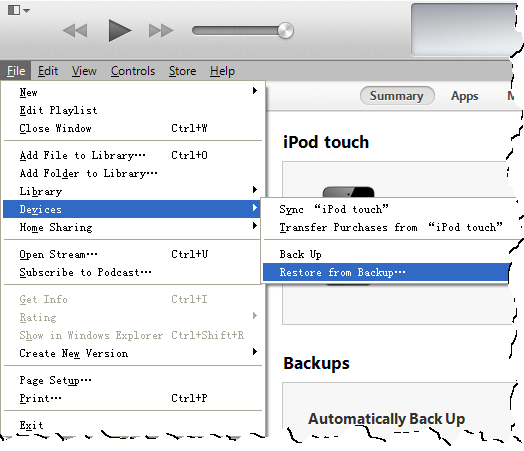
Then just keep the device connected and wait for the device to automatically reboot and restore. When all these finish, your deleted iMessages will appear on your device again.
Retrieve Deleted iMessages by Restoring from iCloud Backup (FREE)
The same as recovering deleted iMessages by restoring from iTunes backup, this method works only if you have the latest iCloud backup files. If you have enabled iCloud, iCloud will back up your iPhone, iPad or iPod touch automatically each day when your iCloud has enough space for the backup and the device is screen-locked and connected to a power source and a Wi-Fi network. To check whether you have an up-to-date iCloud backup file, please tap “Settings” > “iCloud” > “Backup” (in iOS 8 or later) or “Storage & Backup” (in iOS 7 or earlier) on your iDevice. If you are sure that the deleted iMessages are in the iCloud backup file, you can go on following the steps in this method.
You will first need to erase all the content and settings on your device when restoring from iCloud backup, so you may lose the data generated since the backup was created if the backup is not the latest. Think twice before you go on.
Just follow the steps to retrieve deleted iMessages by restoring from iCloud backup file:
- Go to “Settings” > “General” > “Reset” and tap “Erase All Content and Settings”;
- Enter your passcode and Restrictions Passcode.
- Tap “Erase iPhone” twice in the 2 popup warning boxes.
- Input the password of your Apple ID and tap “Erase” to erase the device and remove it from the Apple account.
- Depending on your device, it may take several minutes to finish erasing the information and settings on your device. When the erasure is complete, the device will restart and display a Hello screen.
- Slide from left to right on the screen to start to set up the iOS device.
- Tap to select your country or region.
- Choose a Wi-Fi network to join.
- Enable or disable Location Services.
- Tap “Restore from iCloud Backup”, then “Next”.
- Login in to iCloud with your Apple ID and password.
- Choose the iCloud backup that may contain the deleted iMessages and tap “Restore”.
- Keep your device connected to the Wi-Fi network during the whole process.
- Wait for a while. The time it takes depends on the network speed and the size of the backup file.
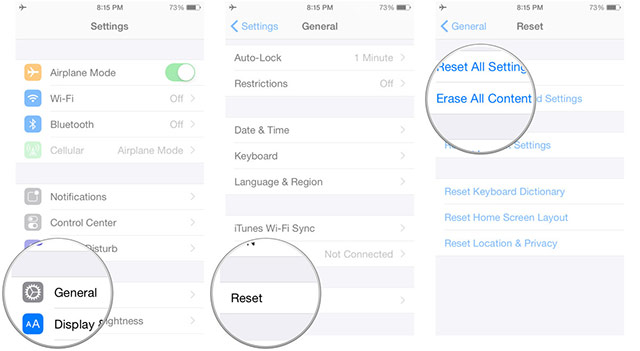
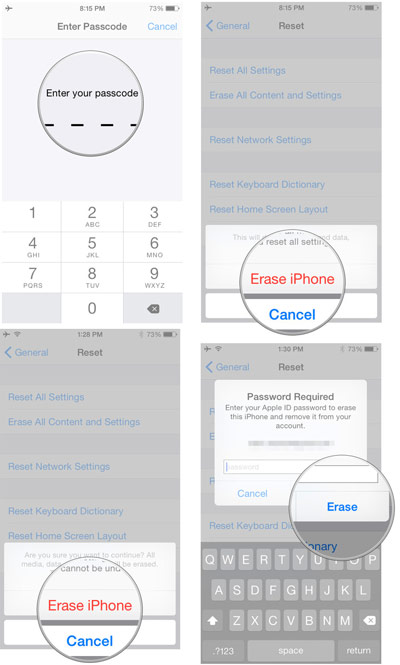
When the restore finishes, you will find the deleted iMessages on the device.
Recover iMessages by Extracting from iTunes Backup
If an iTunes backup is found on your computer, however, the backup file is out of date, and you don’t want to lose the content created since the backup or you are not sure whether the deleted iMessages are contained in the backup file or not, don’t restore the device with the iTunes backup: you have another choice – extracting deleted iMessages from the iTunes backup file with the iMessage recovery tool Dr.Fone for iOS.
You need to download and install the iTunes backup extractor on your PC or Mac before going on.
Dr.Fone for iOS is World’s 1st iOS data recovery software that enables iPhone, iPad and iPod touch users to recover approximately 20 types of data (including deleted messages, contacts, notes, photos, etc.) from iTunes backup files, iCloud backups or the memory of the device. In addition, you can use it to fix the iOS no matter you device is stuck in white screen, black screen, Apple logo or recovery mode loop.
Follow the easy steps below to get the deleted iMessages back from the iTunes backup file:
- Switch off “Find My iPhone” on the device: launching “Settings” app, tapping “iCloud” > “Find My iPhone” and then entering the password.
- Connect your iPhone, iPad or iPod touch to the computer with the iTunes backup viewer installed.
- Run the iTunes backup explorer on the PC or Mac.
- Click the “Recover from iTunes Backup File” tab.
- Select the backup file that may store your lost iMessages according to the given backup date and the device name.
- Click the blue “Start Scan” button.
- The software starts to scan the data in the iTunes backup file and then lists all the found data on the left sidebar by category.
- Click on “Messages” on the left sidebar.
- Use the filters and search box to find the deleted iMessages quickly or check the iMessages by contacts.
- Tick the boxes next to the iMessages that you would like to recover to the device.
- Click “Recover to Device” in the bottom right corner.
- Select “Recover to Device” in the drop-down menu, click "OK" in the pop-up window, then the software begins to back up the messages on your iOS device and transfer the selected iMessages back to the device.
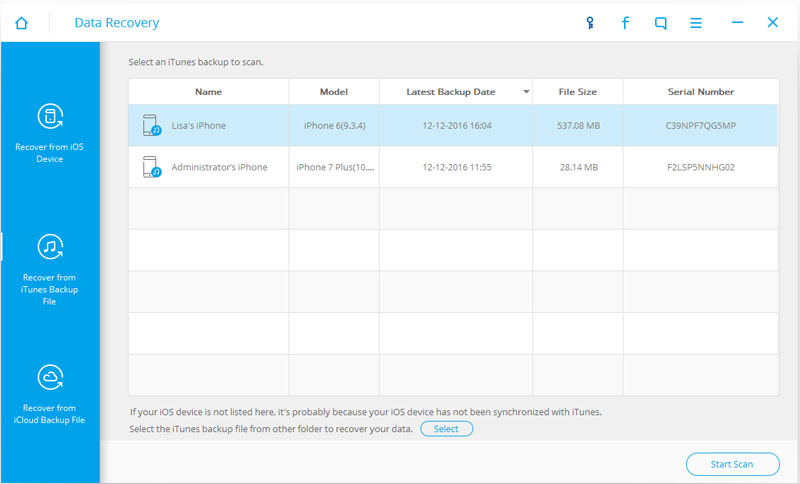
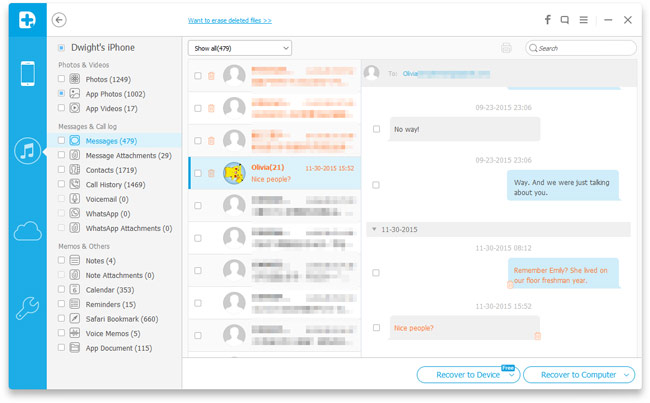
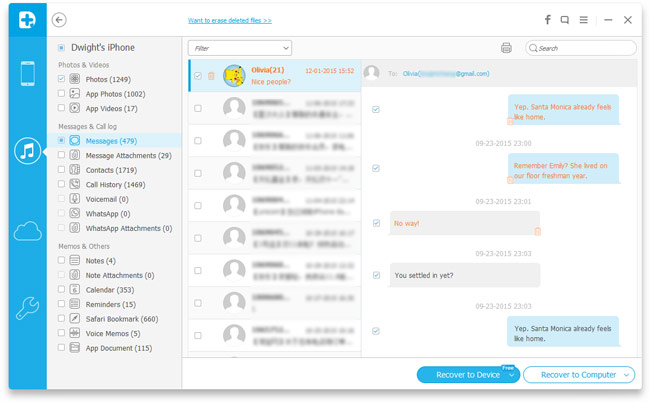
Soon, you will find the recovered iMessages on your device.
In addition to recovering the deleted iMessages back the device, you can also save the found iMessages as an .html file and a .csv file to your computer or directly print them with the printer button: iPhone Data Recovery is also good tool to back up iMessages. What’s more, the contacts, photos, audios, videos attached with the iMessages can also be saved to the computer if you select “Message Attachments” on the left sidebar.
Retrieve iMessages by Extracting With iCloud Backup
If you have an iCloud backup, the backup is the newest, and you are sure the lost iMessages can be found in the backup file, just use the method 3 to retrieve your deleted iMessages. If you think the deleted iMessages may contain in an old iCloud backup file, and don’t mind losing all the data generated after the backup, you can also follow the steps in method 3 to restore the device from the iCloud backup file. If you are not sure whether the deleted iMessages are inside the iCloud backup file or not and want to view the content in the iCloud backup before the restore, or the information created since the backup is also very important to you so that you are worried about losing them, why not try to extract the iMessages from the iCloud backup file with the help of an iMessage recovery software.
The iCloud backup extractor is available for free download with the following buttons:Please install the iCloud backup viewer on your computer when the download is complete.
Here are the steps to recover deleted iMessages by extracting from iCloud backup file:
- Disable “Find My iPhone” on your iPhone, iPad or iPod touch. (If you don’t need to recover the deleted iMessages back to device, this step can be ignored.)
- Link the device to the computer with the USB cable which you use to charge the device.
- Run the iCloud backup browser on your computer.
- Open the “Recover from iCloud Backup File” tab on the software;
- Input your Apple ID and password to log into iCloud.
- The software starts to retrieve the information of the backup files in your account and soon lists all the backups found.
- Move your mouse to the “State” column and click the “Download” button in which row the backup file may include your lost iMessages.
- Uncheck “Select All” and check the boxes next to “Messages”, “Message Attachments” and "Contacts".
- Click “Next” and the software begins to download messages and attachments from iCloud. This step may take a short while, depending on the size of the backup file and your network speed.
- When the download finishes. Click “OK” in the prompt window to continue.
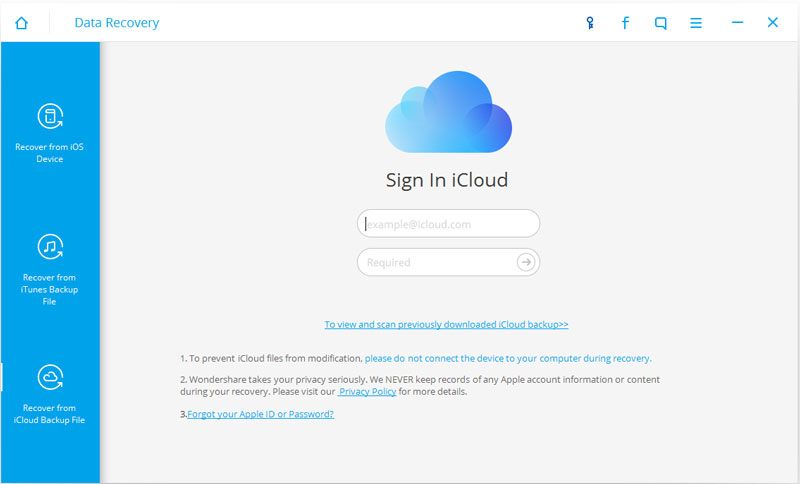
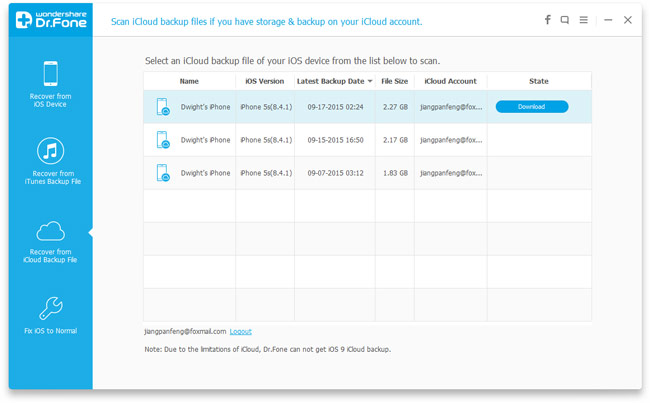
To recover the deleted iMessages to your device, do as follows:
- Click “Messages” on the left column.
- Browse the deleted messages (including iMessages) by contacts, and select the ones that you need to transfer back to the device.
- Click “Recover to Device” in the lower right corner.
- Choose “Recover to Device” from the drop-down menu and press “OK” on the prompt dialog box to let the software backup the messages on your device and copy the checked messages back to the device.
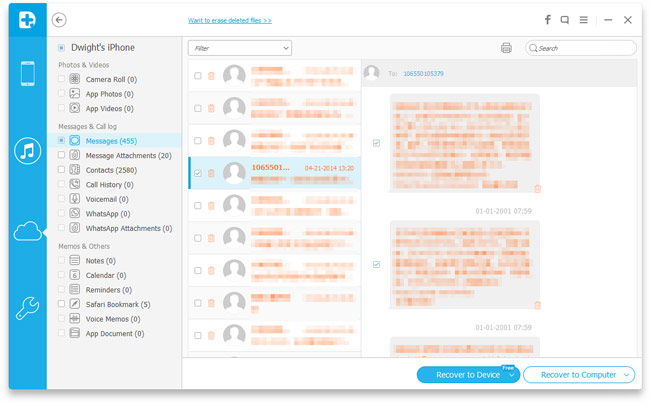
Soon, you’ll find the lost iMessages on the device.
To retrieve the deleted iMessages to your computer, follow the instructions below:- Click “Messages” and “Message Attachments” respectively to view the messages and attachments (such as photos and contacts) found.
- Use the “Filter” and the search box to find the deleted iMessages and attachments quickly, and mark them.
- Click “Recover to Computer”.
- Click “Browse” to specify a directory to store the recovered messages (iMessages included) and attachments.
- Click “Recover”.
Soon the selected iMessages will be saved to your computer as a .csv file and an .html for your further printing, sharing or keeping. The selected attachments will be stored on the computer as the originals.
Recover Deleted iMessages from iPhone, iPad and iPod touch
If you didn’t create any iTunes or iCloud backup for your device before the iMessages were lost, you can still use the iPhone data recovery software to scan the data on the device and recover deleted iMessages for it just like using any other data recovery tool. Since it’s impossible to recover the data that has been overwritten by other new data even with professional data recovery software, stop using the iPhone, iPad or iPod touch or turn on “Airplane mode” on the device as soon as you find that the iMessages were deleted mistakenly. It will greatly improve the iMessage recovery successful rate to try your best to avoid writing or generating new data to the iOS device before the iMessage recovery finishes.
Use the iPhone data recovery app to recover the deleted iMessages right now!
The iMessage recovery tool is downloadable with the links below:Steps:
- (Optional) Turn off “Find My iPhone” on your iOS device if you need to transfer the recovered iMessages back to the device.
- Connect the iOS device to your PC or Mac.
- Install and open the iMessage recovery tool.
- Switch to the “Recover from iOS Device” tab, generally, it’s the default one.
- Select “Messages & Attachments” and "Contacts" from the list of data types.
- Hit “Start Scan”.
- (Optional) If your iTunes backup is encrypted with password, you may need to input the password.
- The software analyzes and scans the device, which may take a few minutes.
- The “Messages” and the “Message Attachments” categories will be listed under “Messages & Chat log” on the left.
- Highlight the “Messages” of the "Messages & Call log" category on the left sidebar to preview the found iMessages on the right.
- Pick the iMessages that you want to recover to your device by contacts or using the search box and tick the checkboxes beside the iMessages.
- Click “Recover to Device” and then choose “Recover to Device” from the drop-down list.
- Press “OK” in the pop-up dialog box and the iMessage recovery software starts to back up all the messages on your device (in order to avoid any possible data loss) and then move the selected iMessages back to the device.
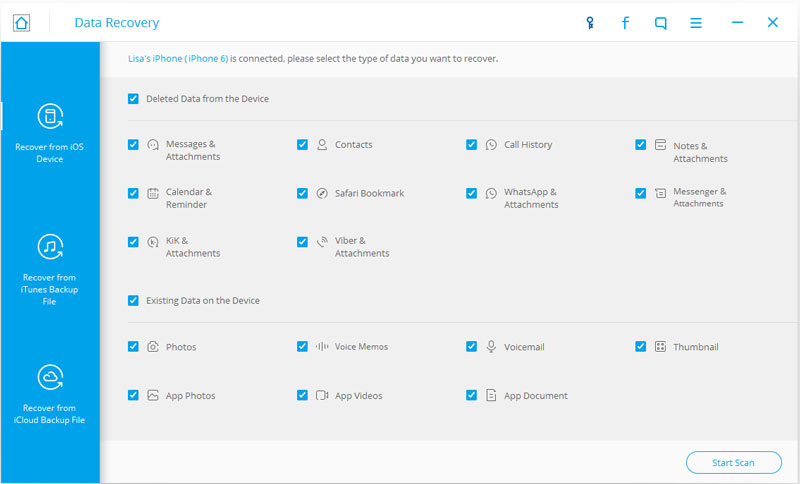
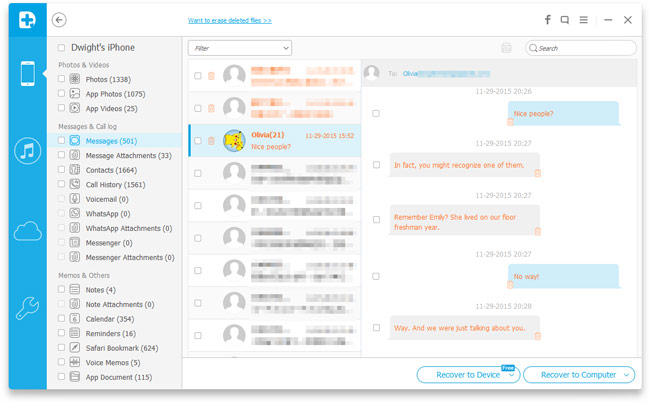
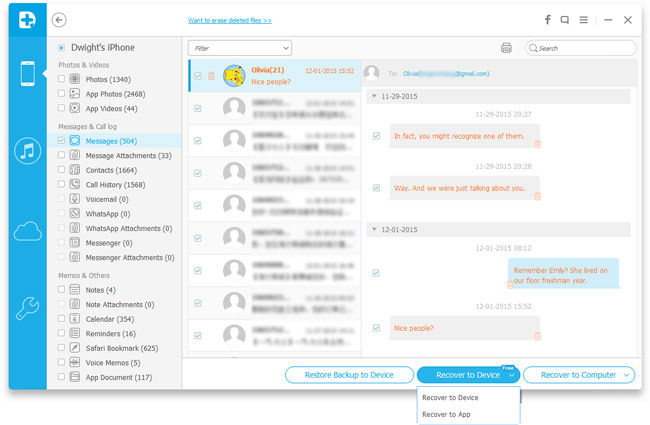
All are done, just go to the Messages app on your iDevice to find the recovered iMessages.
If you don’t want to recover the deleted iMessages back to the device, you can choose “Recover to Computer” in the step 12, and then set an output path to save the retrieved iMessages (in the form of an .html file and a. csv file) on your computer. If you need to back up the found pictures, contacts, audios and videos attached with the iMessages to your PC or Mac, you should also preview the content in “Message Attachments” in step 11. Besides, you can also print the selected iMessages directly with the printer button appears in step 11.
Till now, no matter whether you have more than one iOS devices to keep the iMessage going across all of them, no matter whether an up-to-date iTunes or iCloud backup were created before the loss of the iMessages, you can use the methods introduced in the iMessage recovery tutorial to retrieve deleted iMessages effortlessly.
Any questions or suggestions about this tutorial, iMessage recovery, the software on the site or the site will be highly appreciated. Feel free to leave your ideas below or email us.
You may also like:
- How to retrieve deleted SMS on iPhone
- How to recover deleted contacts from iPhone
- How to recover deleted photos on iPhone
- How to restore iPhone without iTunes
- iPhone recovery mode - Everything you need to know!
- Fix iPod, iPad & iPhone stuck on Apple screen
- How to retrieve deleted Facebook messages
- How to recover messages from Android, iPhone and BlackBerry

