Free iOS Screen Recorder to Record Screen on iPhone, iPad and iPod touch
Considering security and privacy issues, Apple doesn’t allow developers to build apps to record screen of iOS devices in App Store. However, if your iPhone, iPad or iPod touch has been jailbroken, there are still opportunities for you to get the screen of your iPhone, iPad or iPod touch recorded with Cydia apps. Then, here comes the question: how can we record iOS screen without jailbreak?
Actually, if we are not able to record screen on iOS devices directly, we can try to record the screen of iOS devices on a Windows PC or a Mac computer.
In this article, 3 free iOS screen recorder will be introduced:
Free iOS Screen Recorder for Windows to record iPod, iPad and iPhone screen on PC.
Free Screen Recorder for iOS to record iOS Screen on Mac computer.
Free iOS Screen Recorder for iOS 11 or later to record iOS screen on the device.
Free iOS Screen Recorder for Windows
The iOS manager software, Dr.Fone, is built in with dozens of features, and free iOS Screen Recorder is just one of them. Besides iOS screen recording, Dr.Fone also acts as an iOS data recovery software to recover deleted files from device storage, iTunes and iCloud backup; works as an iTunes alternative to back up and restore data on iPhone, iPad and iPod; functions as an iOS system recovery to fix iPad and iPhone stuck on Apple logo, recovery mode loop, black screen, and more; performs as an iOS data eraser to clear private data on iPhone or iPad, or completely wipe iPhone or iPad.
The iPhone manager software Dr.Fone with the free iOS screen recorder built in is available for free download at:
Follow these steps to record iPhone and iPad screen using the free screen recorder for iOS on Windows PC.
- Download, install and launch the free iOS screen recorder on your computer.
- Connect both your computer with the free iOS screen recorder installed and the iOS device to the same Wi-Fi network.
- Navigate to “More Tools” tab on the left column, then click “iOS Screen Recorder”.
- Mirror your iOS device on your computer:
- On your computer, click the round “Record” button to start recording iOS screen, and click it again to stop recording. The recorded video will be saved to your computer, and the folder that stores the recorded video will be opened automatically after the recording.
If it’s your first time to use this feature, you may need to click the “Install” button to download and install the free screen recorder for iOS first.
On your iPod touch, iPad or iPhone running iOS 10, swipe up from the bottom edge of any screen to open control center, tap “AirPlay Mirroring” and select “Dr.Fone (PC NAME)”, the screen of your iOS device will be mirrored on your computer.
If your iOS device runs iOS 7, iOS 8 or iOS 9, you may need to tap “AirPlay” > “Dr.Fone (PC NAME)”, and then toggle “Mirroring” on instead in the control center, the screen of the iOS device will display on your Windows PC.
When you use the free edition of the iOS screen recorder, a big fixed logo will appear in the center of the final video. If you are not happy with the logo, you may need to pay for it. However, when the screen of the iOS device is mirrored on the computer, only a small logo will cover the upper left corner, which won’t have too much effects on the display if you use the free edition to make a presentation, demo a new iOS app or give a visual lesson.
Free iOS Screen Recorder for iOS on Mac
On a Mac, you can easily record the screen of iPhone, iPad and iPod using QuickTime Player without the needs of installing a third-party iOS screen recorder app. QuickTime Player has been given powerful features of recording: Movie Recording (recording movies with built-in cameras of Mac and various external cameras, and recoding screen of iOS devices), Audio Recording (recording audios from built-in microphone, external microphone, or other Core Audio-compliant audio device), Screen Recording (creating a movie by recording everything that happens on Mac screen or on a portion of Mac screen, along with narration, if you’d like). Obviously, we should use the Movie Recording feature of QuickTime Player to record screen of iOS devices, such as iPhone, iPad and iPod touch, etc.
Though the iOS screen recorder, QuickTime, is a built-in app on Mac OS X, the following requirements should be satisfied to make sure the success of iOS screen recording:
The version of Mac OS X on MacBook, iMac, Mac mini and Mac Pro should be 10.10 Yosemite or later;
The iPhone, iPad and iPod touch should run iOS 8 or later.
The Mac and iOS device are connected with a Lightning to USB cable.
When all the above things are ready, you can start to record screen of iOS device on your Mac. Just follow the steps:
- Run the QuickTime Player app on your Mac.
- Choose “File” > “New Movie Recording” on the menu bar.
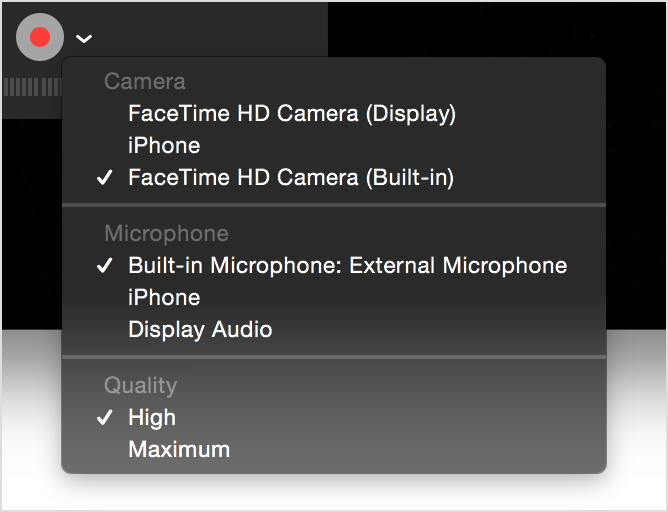
- Click the arrow next to the red circle “Record” button to specify the iOS device (iPhone, iPad, iPod touch) that you want to record the screen as the “Camera”, the source of the audio (with the submenu of “Microphone”), and quality of the screen recording video.
- With the volume bar, you can monitor the audio when it’s being recorded.
- Start recording the iOS screen by clicking the “Record” button
 and use the same button to stop recording when you are done.

Free iOS Screen Recorder for iOS 11 or later on iOS Device
In iOS 11, Apple add a new feature for all the iPhone, iPad and iPod touch users to record screen of the iOS device with ease. The most important is that the screen recording is a built-in function and no third-party app is needed.
To enable the iOS screen recording feature, open the “Settings” app, go to “Control Center” > “Customize Controls” and then tap the plus sign ![]() beside “Screen Recording”.
beside “Screen Recording”.
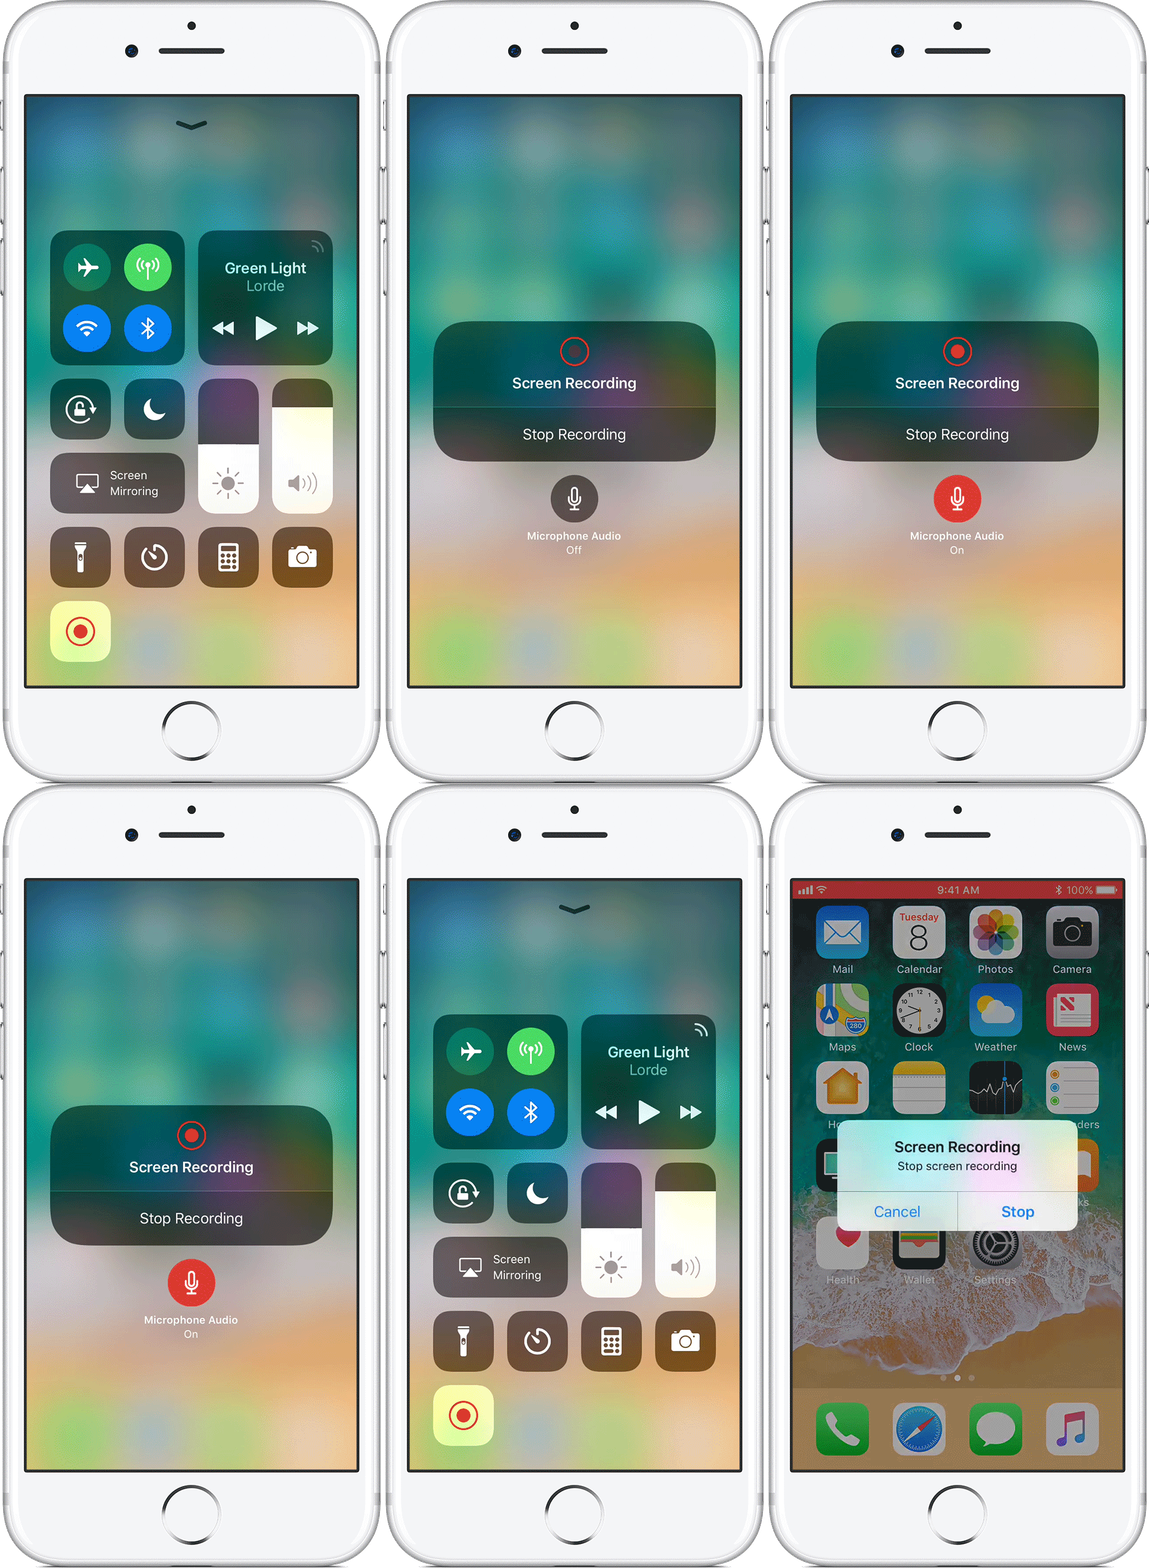
Now you can start recording the iOS screen at any time from Control Center:

- Swipe up from the bottom edge of any screen on your iPhone, iPad and iPod touch to open Control Center. On iPhone X or later, you should swipe down from the upper-right corner of the screen. In addition, on iPad, you can also double-click the Home button.
- Tap the gray dot in circle button
 and wait for 3 seconds until the countdown finishes to start recording. If you need to capture sound for the screen recording, press deeply on the “Record” button
  and tap “Microphone Audio”.
 - Tap the red status bar at the top of the screen and tap “Stop” in the pop-up dialog to finish recording. Surly, you can also open Control Center and tap the red dot in circle button
 to stop recording.
The iOS screen recording will be automatically saved to your device after recording. You can find it in the Camera Roll album of the Photos app.
Till now, you have at least 3 methods of recording iPhone, iPad and iPod touch screen for free. If you still need to learn more information about the free iOS screen recorders or find the answers in which the post doesn't mention, feel free to contact us by leaving a comment below or sending us an email.
You may also like:
